Setting up a Facebook page isn’t the drama it might appear to be. Here is a quick tutorial through setting one up.
1. To set up a page, you need a personal profile
While this might appear a little bit silly, it really isn’t. Facebook pages need you to have a profile, because it sets you as an administrator of that page.
So – the first thing you need to do (if you haven’t done it already) is set yourself up on Facebook.
You needn’t be worried that people who interact with your page will see your personal profile, because they won’t. This is the beauty of running a page as opposed to trying to promote your business using a personal profile. For more information about keeping your business and your personal profile separate, read our article here.
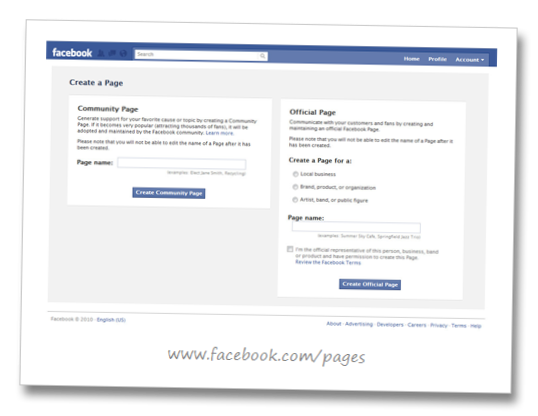
2. Find the link to setting up a page
This can be slightly difficult to find. So, to help you, the link is here.
Select which type of page you want to create (business, brand, artist), give it a name, tick the authority box, and hit ‘create official page’.
When you name your page, try to give it as accurate a name as possible. In some cases, the name you want might be taken. If it is, don’t panic: just try to think of an alternative name that still represents your business. If you run a photography business, for example, you could add ‘photography’, or ‘studio’, or something similar to the end of the name.
3. Make the page profile as complete as possible
Once you have created your page, you will be faced with a huge variety of options. The best thing to do is make it as complete as possible.
Choose a representative image for the page’s picture, such as your logo. Complete your business address, business hours, and any other information that is relevant.
Hot tip: Your profile image is constrained by width, not height. If you want to maximise the branding space available to you, make a tall skinny image. One idea is to join your logo to other images relating to do your business. For example:

Zoo Studio make great use of their logo image
Once you set up your page, Facebook will step you through the parts that you need to complete. It will also prompt you if the page is not fully filled out.
4. About page URLs
You can choose a specific URL for your page, but only once you have a certain number of people who ‘like’ it. When you get to that level, your URL will be http://www.facebook.com/NAMEHERE.
The best way to choose your URL is to make it the same – or as close as possible – to the name of the page itself.
5. Start posting, and inviting people to connect
Now comes the exciting part! You can start posting to the page’s profile: statuses, photos, links, and so on – just like you would with your own profile page.
Once you have some content on your page, click ‘suggest to friends’ on the left-hand side, and invite everybody you think would be interested.
After this point, it’s all about interacting and building your social network. There are many ways you can do this. For example:
- add ‘join us on Facebook’ links to your web site
- add your Facebook page link to your email signature
- and so on.
For more tips about building your Facebook network, read our article here.
share this